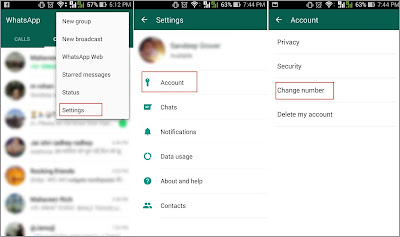
How to Change Your WhatsApp Phone Number without Reinstalling
Next time if you want to change your mobile number, there is no need to Uninstall and Reinstall WhatsApp. Just follow some simple steps and your WhatsApp account will migrate to another no.
Go to WhatsApp Settings > click on Account > click on change number
Now you will see change number option, please click on Next > write your old mobile number first and then new mobile number and click on > Done
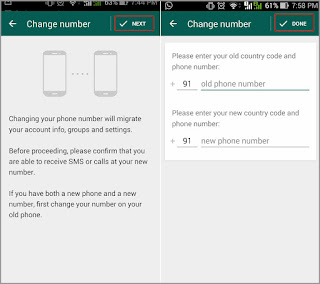
Please verify your new number, and all your chat, history, groups will be transferred to the new number. Now your WhatsApp is ready for use with different mobile number.
How to use WhatsApp on your personal computer / MAC
Now you can use WhatsApp on your Personal Computer / MAC.
1. Go to this website https://web.whatsapp.com/
2. After opening this link, you will see a QR code to scan from your mobile. Click on “Keep me signed in” box.

3. Open WhatsApp on your mobile and click on three dots in upper right corner.

4. Select WhatsApp Web in the drop down.

5. Click on + sign.

6. Now you will see a QR code scanner, Scan the QR code in your system and mirror the device.

7. Your PC is connected with WhatsApp and your will get the below screen.

Now you can use WhatsApp on your PC as well as on Mobile. You need to follow these process only once, next time open this website https://web.whatsapp.com/ and your Web WhatsApp is ready to use. If you want to disconnect WhatsApp from your PC, Please logout. Thanks!!
1. Go to this website https://web.whatsapp.com/
2. After opening this link, you will see a QR code to scan from your mobile. Click on “Keep me signed in” box.
3. Open WhatsApp on your mobile and click on three dots in upper right corner.
4. Select WhatsApp Web in the drop down.
5. Click on + sign.
6. Now you will see a QR code scanner, Scan the QR code in your system and mirror the device.
7. Your PC is connected with WhatsApp and your will get the below screen.
Now you can use WhatsApp on your PC as well as on Mobile. You need to follow these process only once, next time open this website https://web.whatsapp.com/ and your Web WhatsApp is ready to use. If you want to disconnect WhatsApp from your PC, Please logout. Thanks!!
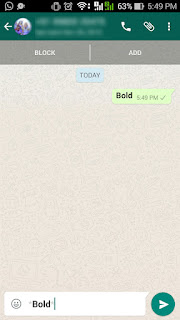
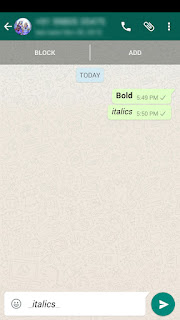
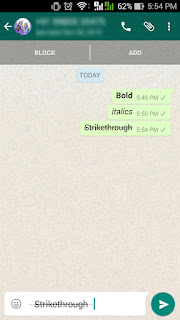
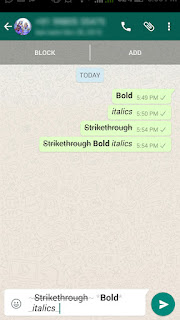
How to change text in bold, Italics and stirkout on whatsapp
1. Add asterisk * to both side of the word *bold*, It will change your text to bold.
2. Add underscore _ to both side of the word _Italic_, it will change your text to Italics.
3. Add tilde ~ to both side of the word ~strikethrough~, it will change your text to strikethrough.
2. Add underscore _ to both side of the word _Italic_, it will change your text to Italics.
3. Add tilde ~ to both side of the word ~
4. You can combine any of these choices together.
How to Enable Google Adsense Ads on YouTube Videos
1. Go to Youtube.com and Click on My Channel

2. Next click on > Video Manager

3. Again click on Channel from left side menu.

4. Click on Channel > Monetization from left menu

5. If you do not have an approved Google AdSense account, please click on “How will I be paid” and follow the interaction.

6. Once you click on “How will I be paid” section. Please follow the below interaction.
- Click on “AdSense Association page” follow the "next" step to go to AdSense website.
- Please select Yes, it will go to Google a/c sign in.
- Please sign with your Gmail account and proceed.
- Accept the Adsense.
- Fill the form with your contact information and submit.
- You'll be forwarded to YouTube and will get a message saying that your AdSense request has been received.
- Once your account is activated, you'll get a mail to inform you that your AdSense account has been associated in your YouTube account. Note - It may take up to 48 hours for the association to be fully active.

7. Once your AdSense account ready, Please click on “Enable Monetization”

8. Please click on to Video Manger and you can see the $ Dollar Sign with your video. It means you account has been ready for Google Ads. ($ sign with globe icon on right side check the below image)

Note – Please do not click your YouTube live Ad from your system to test them. It is a violation of Google Ad sense policy.
How to add Facebook Like or Share button on your Blog or Website
How to add Facebook Like or Share button on your Blog or Website.
1. Create your page on Facebook. (Click the right side green button)

2. Go to this link https://developers.facebook.com/docs/plugins/page-plugin and click on page plugin menu.

3. Fill the information (Put your Facebook page URL, width and height of your placement space.

4. Click on the Get Code button. (You can see the preview of your Facebook page)

5. Copy the Iframe and save it in the Notepad

6. Go to your blog > setting > layout > and Click on “+ add a Gadget”

7. Select HTML/Java Script Gadget and paste the Iframe script in the box.

8. Now you can see the Facebook Like or Share button on your Blog.

Hope you like this. Give your comment and feedback or question in the text box below.
A new feature in WhatsApp latest version 2.12.560
A new #feature in WhatsApp, if you want to reply a specific msg.....now you can do it.... select the post u want to reply... you will see a curved left arrow. Select that and you can type your answer. Its like a tread message.
You can see the #Curved arrow in below image.

It works for IOS and Android as well.
How to export Illustrator file to PNG with transparent background
Learn how you can save Illustrator file as PNG format with transparent background.
1. Go to File > Export
2. Select PNG in Save as type
3. Select transparent in PNG option
4. Export it

1. Go to File > Export
2. Select PNG in Save as type
3. Select transparent in PNG option
4. Export it

How to Import JPEG file in Adobe Illustrator
Learn how you can Import JPEG file in Adobe Illustrator.

How to export Illustrator A4 page to JPEG
Learn how you can save Illustrator A4 page as JPEG format.


How to export Illustrator file to JPEG
Learn how you can save Illustrator file as JPEG format. How to export Adobe Illustrator file to JPG.


Geometrical-backgrounds
These two geometric backgrounds have become so popular because they look great used in Graphic design and presentations, wallpapers, website backgrounds, decoration and more.

Download the file

Download the file
Designed by Freepik
How to Convert PPT to Video
How to Convert PPT to Video.
1. Click > File > Export (Shortcut key: Press ALT+F then press E then Z)

2. Click > Create a Video > Select the device

3. Now select the Second spent on each slide, you can give 5 sec. per slide. Click > Create video button.

4. Click > Create video button and select the Mp4 format and Covert PPT to Video.

Subscribe to:
Posts
(
Atom
)


14 comments :
Post a Comment